| “This site contains affiliate links for which OEMDTC may be compensated” |
NHTSA Campaign Number: 17V461
Manufacturer Mitsubishi Motors North America, Inc.
Components VISIBILITY
Potential Number of Units Affected 100,082
Water Intrusion may cause Wiper Motor Failure
Failure of the wiper motor can cause a loss of visibility, increasing the risk of a crash.
Summary
Mitsubishi Motors North America, Inc. (MMNA) is recalling certain 2007-2013 Outlander vehicles.
In the affected vehicles, water may drop between the hood and the windshield and leak into the wiper motor breathing hole.
The water may cause internal corrosion of the windshield wiper motor and the possible failure of the motor.
Remedy
MMNA will notify owners, and dealers will replace the wiper motor, free of charge.
The recall began July 28, 2017.
Owners may contact MMNA customer service at 1-888-648-7820.
MMNA’s number for this recall is SR-17-003.
Notes
Owners may also contact the National Highway Traffic Safety Administration Vehicle Safety Hotline at 1-888-327-4236 (TTY 1-800-424-9153), or go to www.safercar.gov.
Check if your Mitsubishi has a Recall
| SUBJECT:
WINDSHIELD WIPER MOTOR – SAFETY RECALL CAMPAIGN |
No: SR-17-003 | ||||||||||||||||||
| DATE: July 2017 | |||||||||||||||||||
| MODEL: 2007-2013 Outlander | |||||||||||||||||||
| CIRCULATE TO: | [ X ] GENERAL MANAGER | [ X ] PARTS MANAGER | [ X ] TECHNICIAN | ||||||||||||||||
| [ X ] SERVICE ADVISOR | [ X ] SERVICE MANAGER | [ X ] WARRANTY PROCESSOR | [ X ] SALES MANAGER | ||||||||||||||||
PURPOSE
This bulletin provides directions for replacing the windshield wiper motor. This bulletin is meant to be used in conjunction with bulletin SR-16-009, “Windshield Wiper Link – Safety Recall Campaign.” SR-16-009 must be performed where indicated before this bulletin can be resumed.
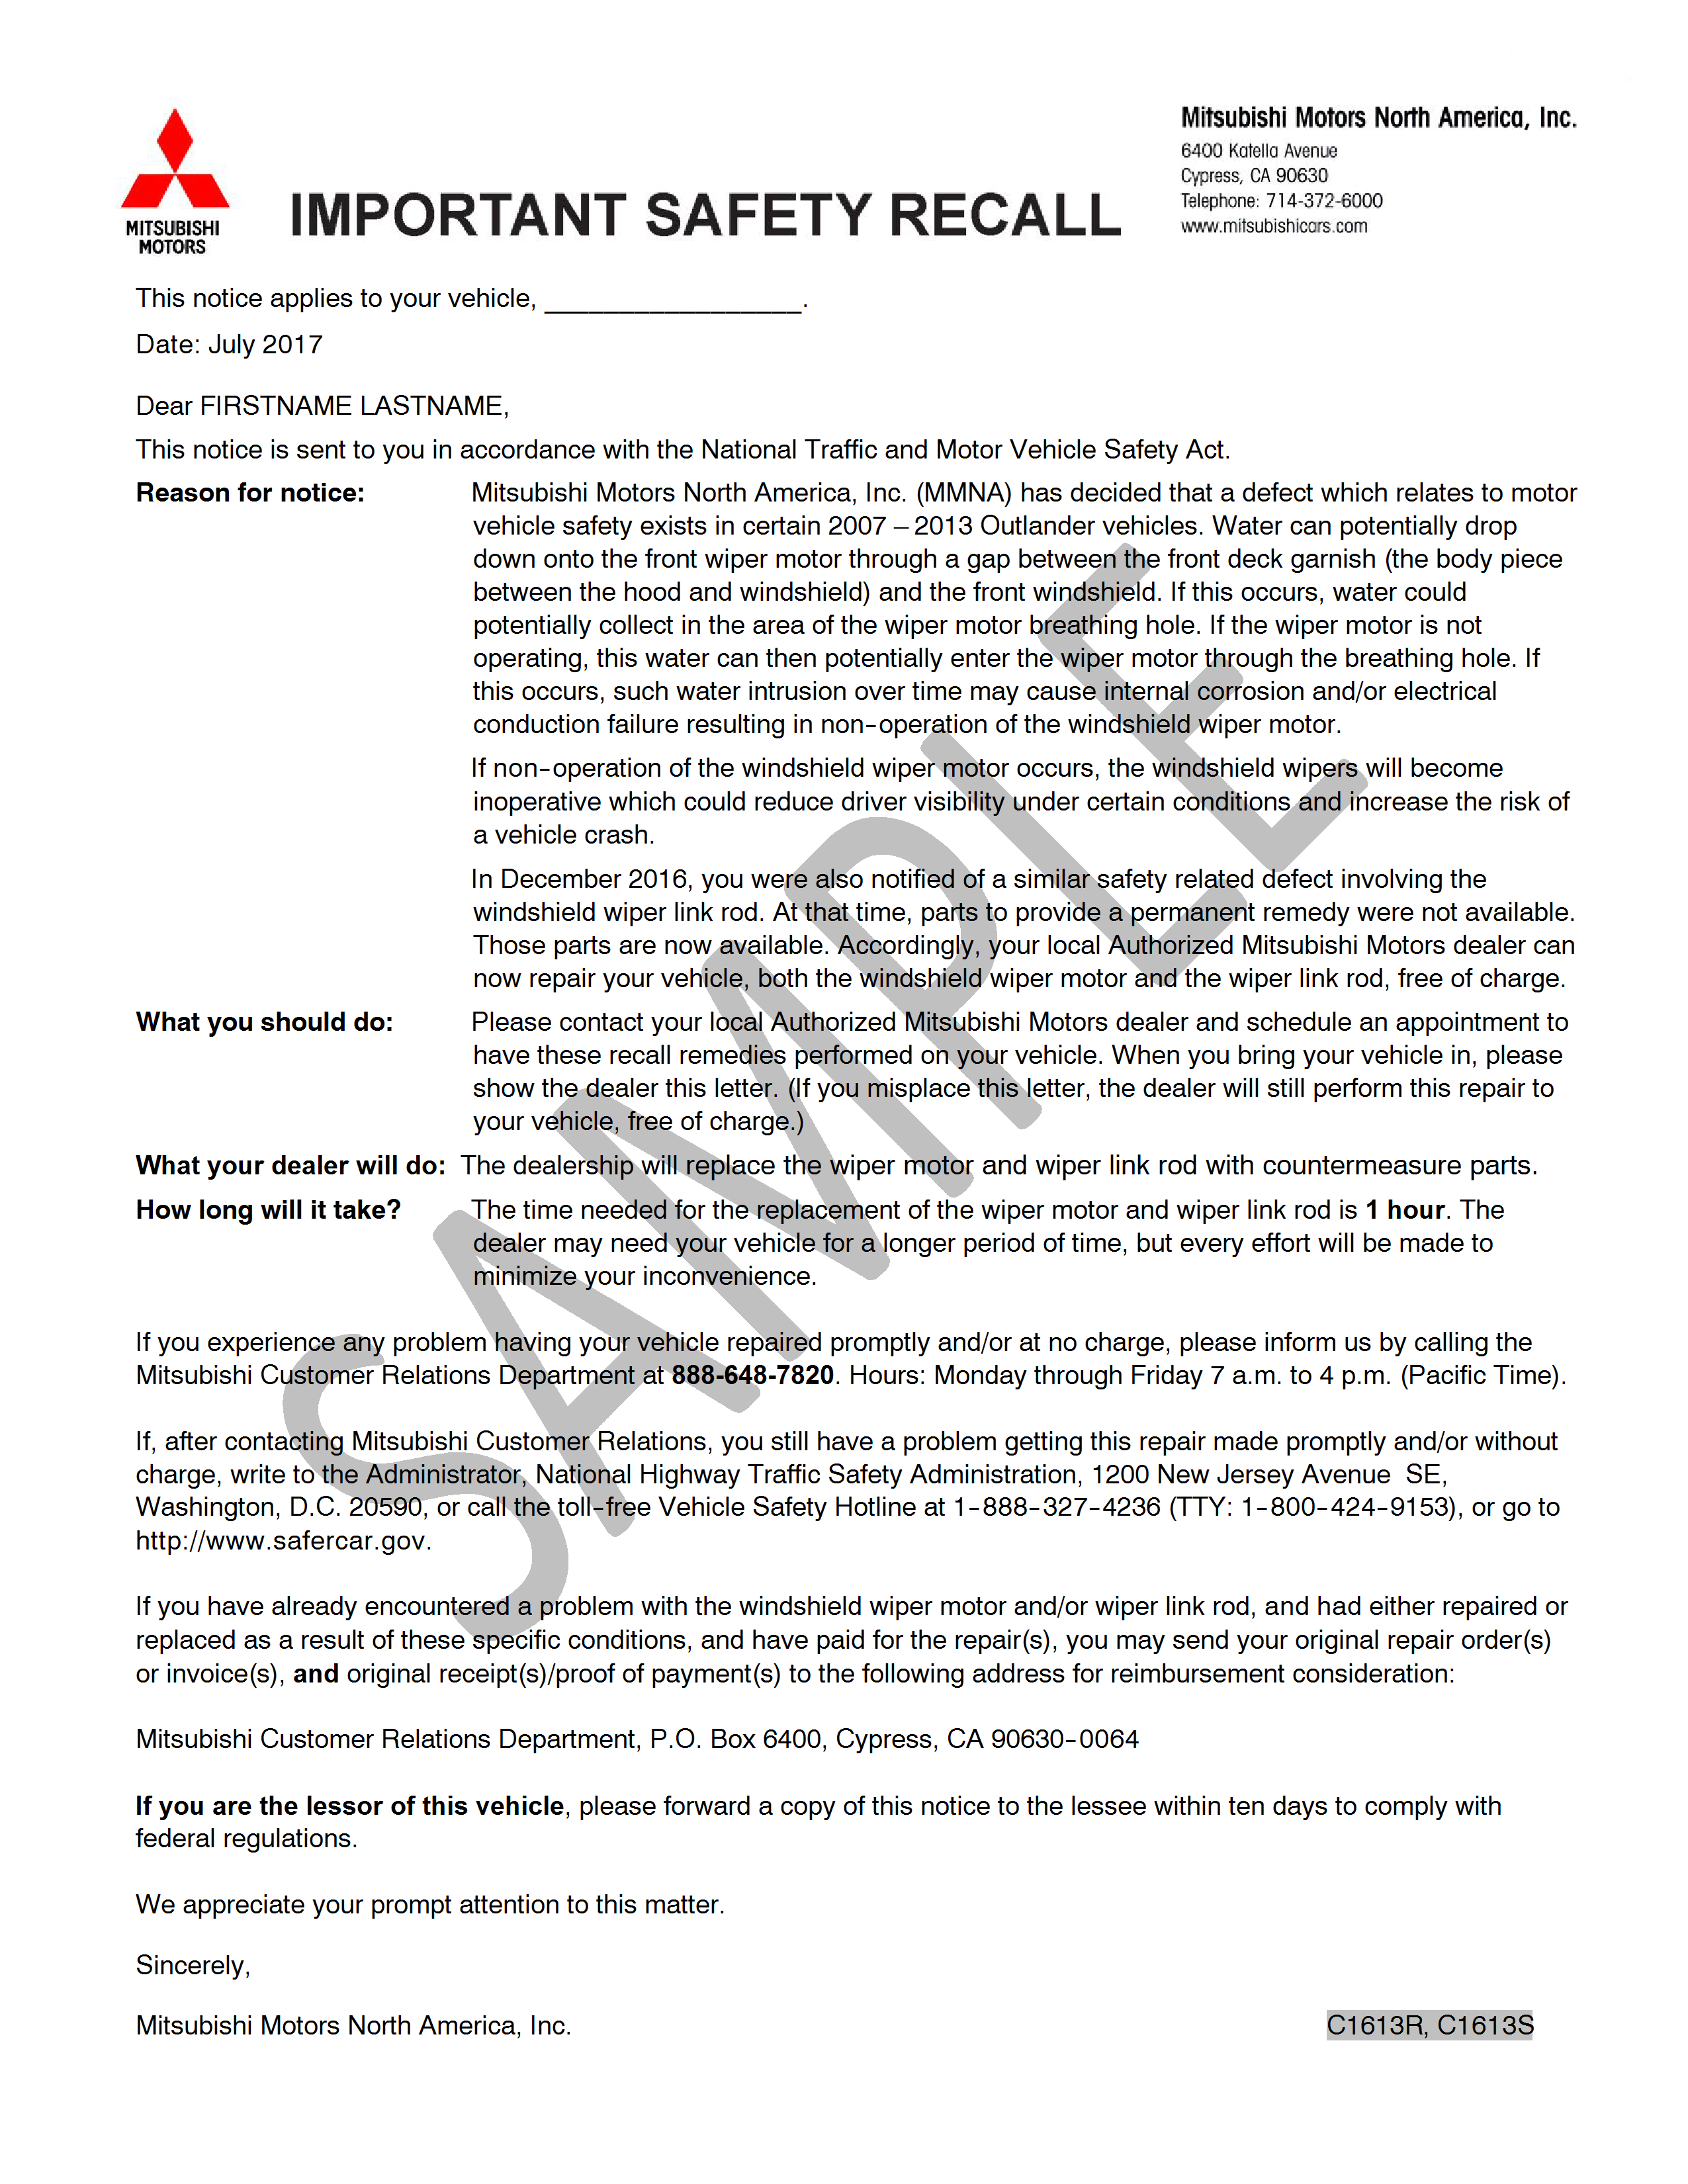
BACKGROUND
Water can potentially drop down onto the front wiper motor through a gap between the front deck garnish (the body piece between the hood and windshield) and the front windshield. If this occurs, water could potentially collect in the area of the wiper motor breathing hole. If the wiper motor is not operating, this water can then potentially enter the wiper motor through the breathing hole. If this occurs, such water intrusion over time may cause internal corrosion and/or electrical conduction failure resulting in non-operation of the windshield wiper motor.
If the windshield wiper motor stops operating, the driver will not be able to activate the windshield wipers, reducing driver visibility under certain conditions and increasing the risk of a vehicle crash.
AFFECTED VEHICLES
2007 – 2013 Outlander

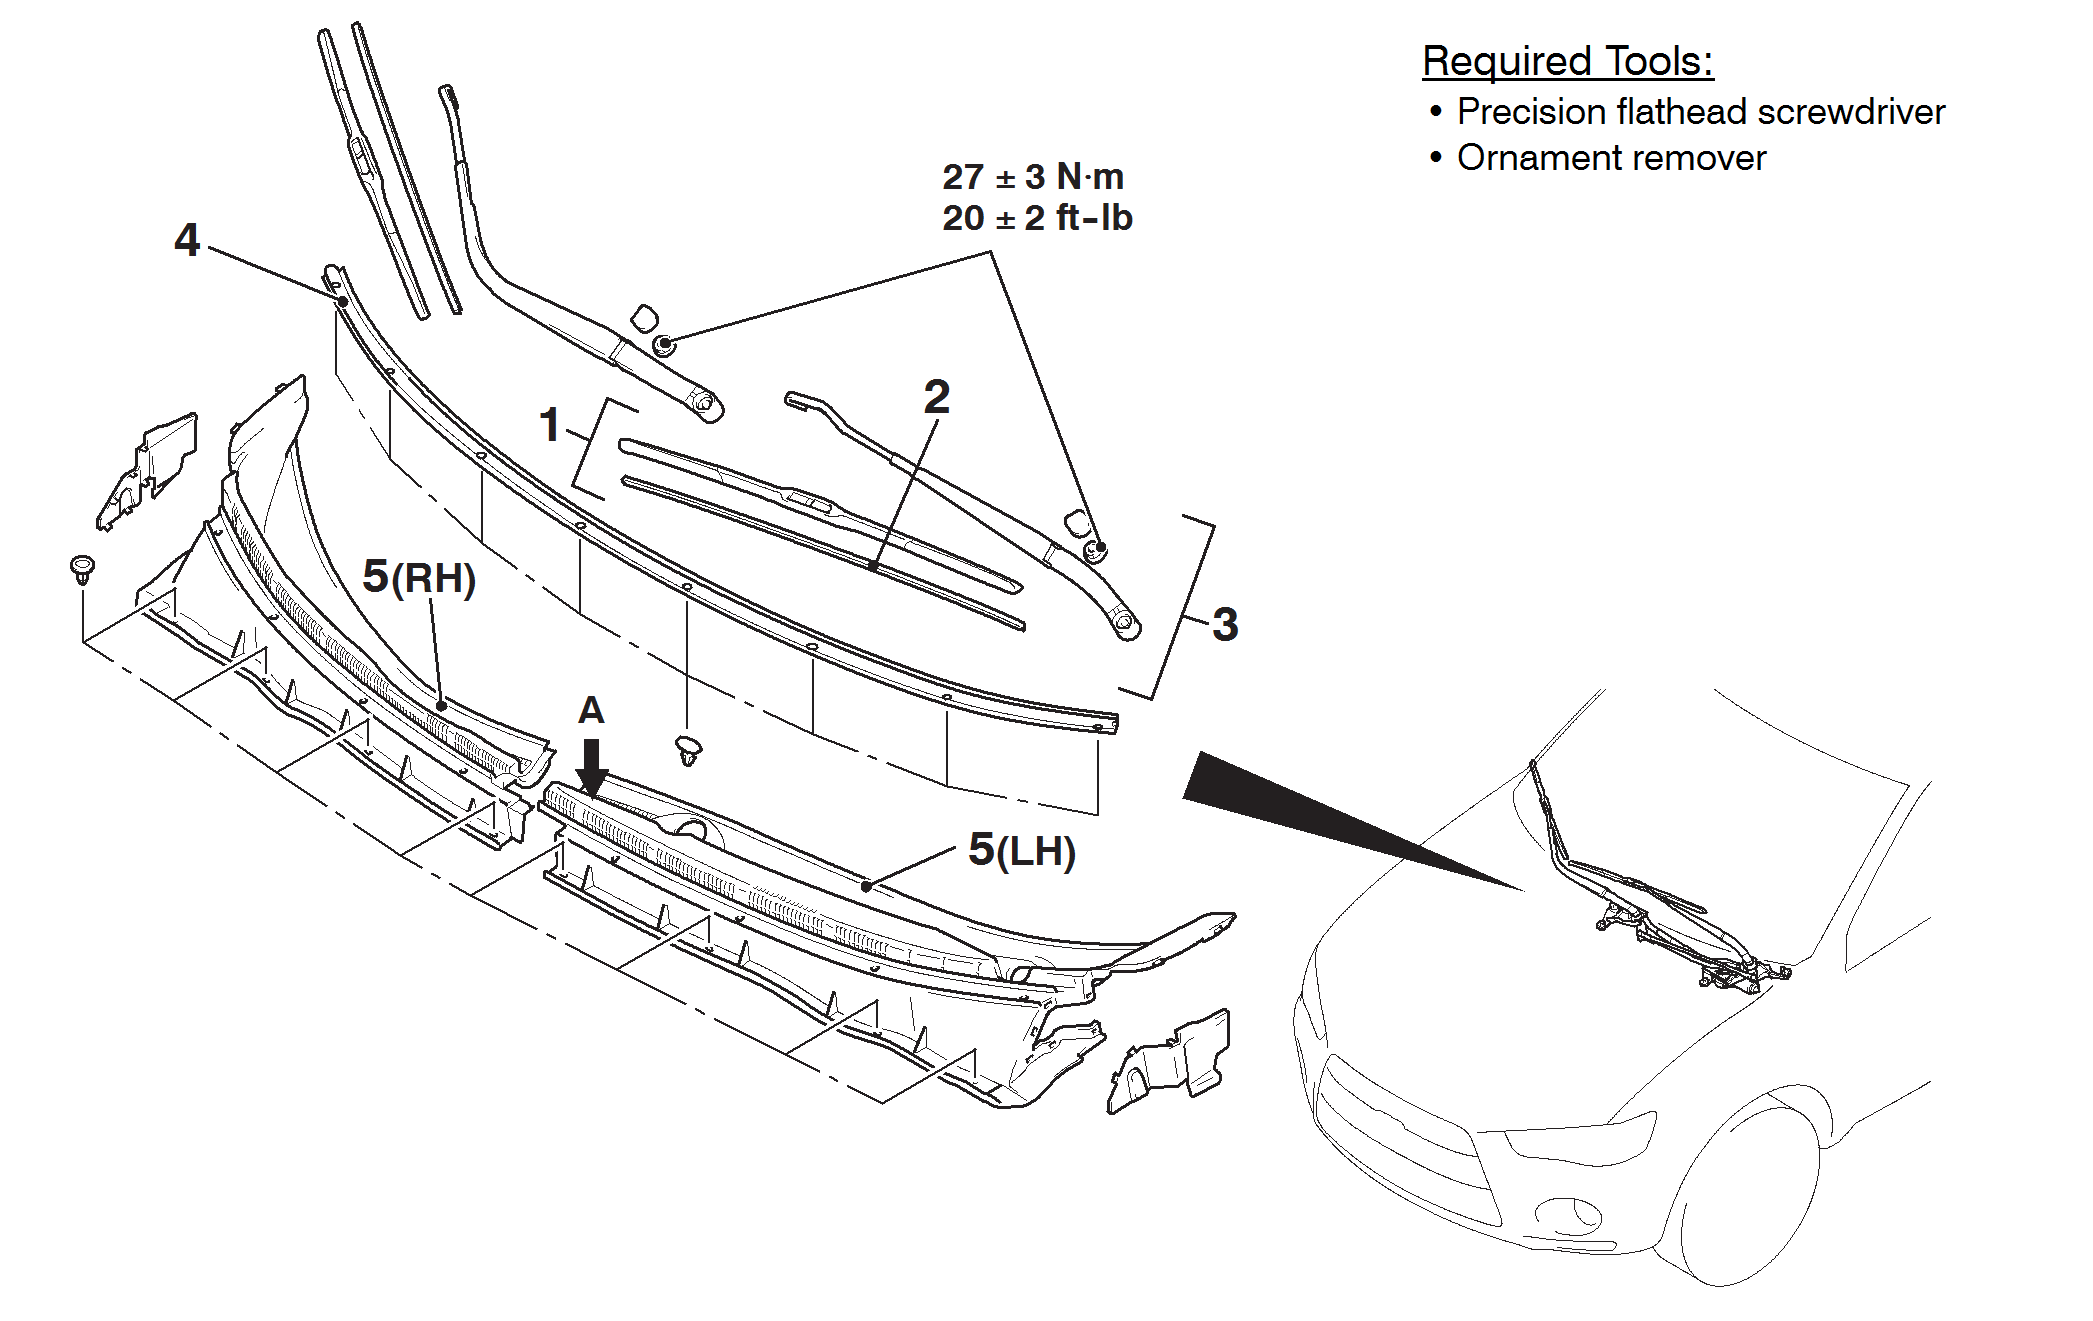
REQUIRED EQUIPMENT
- Precision Flathead Screwdriver
- Adjustable Wrench
- Straight Edge
- Ornament Remover (Trim Stick)
- Hose
- Scissor
- Pry Bar
- Masking Tape
- Marker

WIPER MOTOR REPLACEMENT PROCEDURE
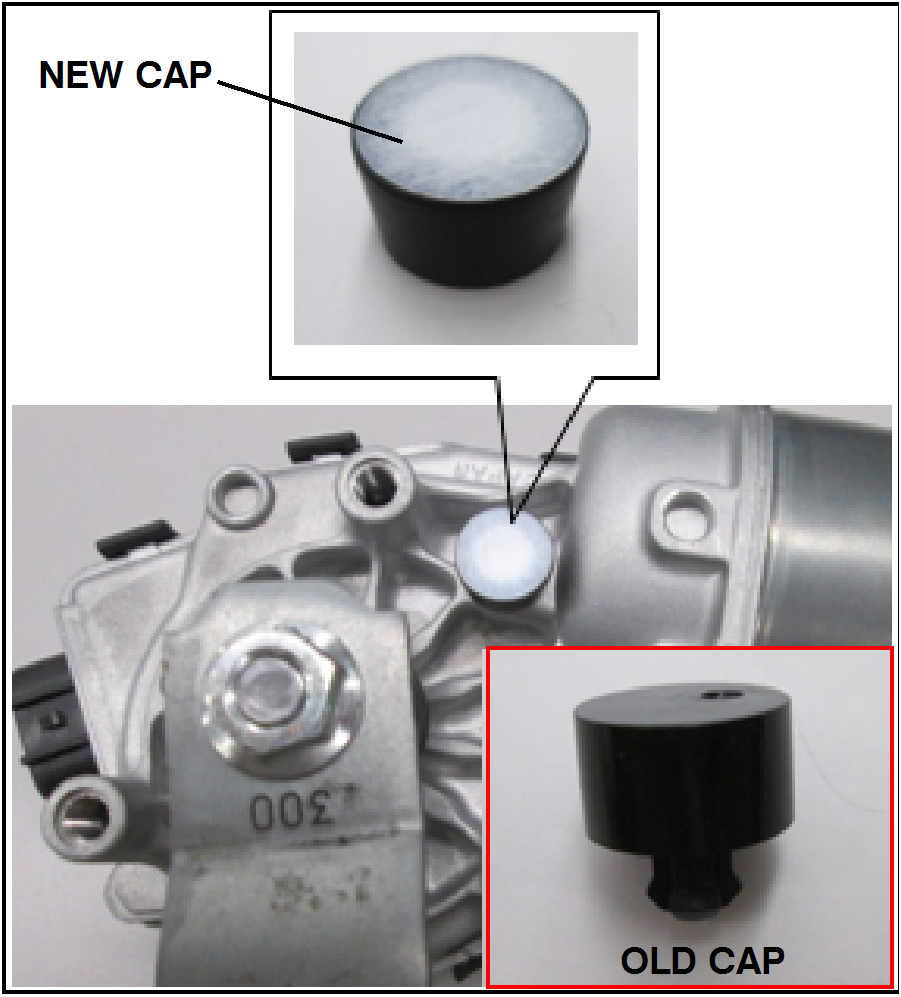
 Do NOT mix old parts with new parts.
 |
|
 |
|
 |
|
 |
|
 |
|
 |
|
 |
|
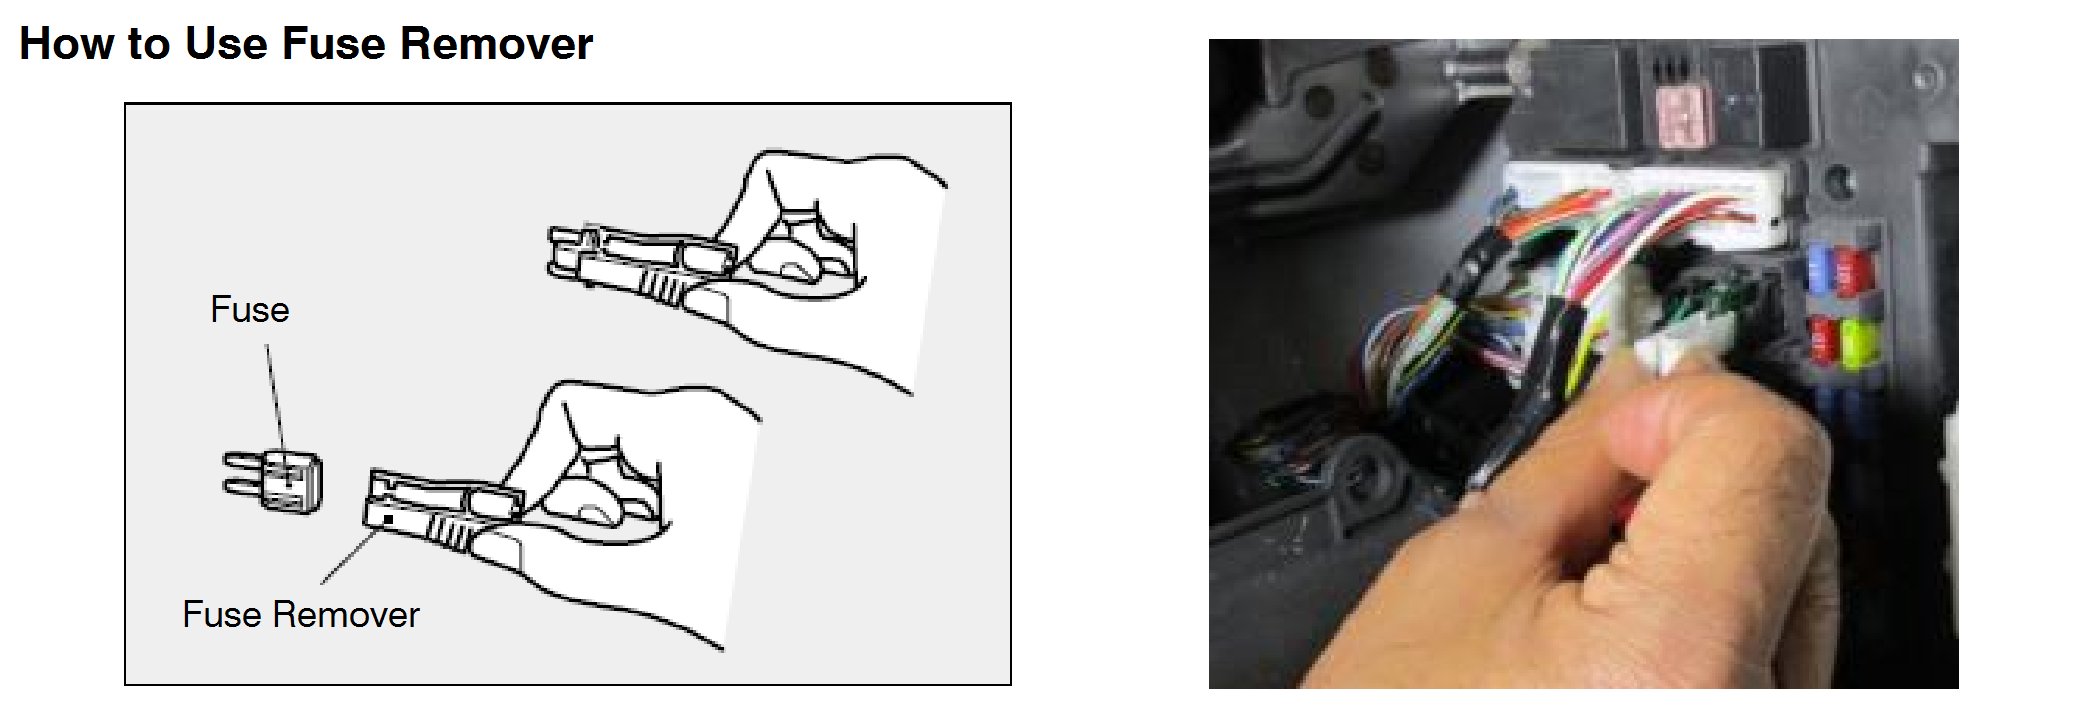
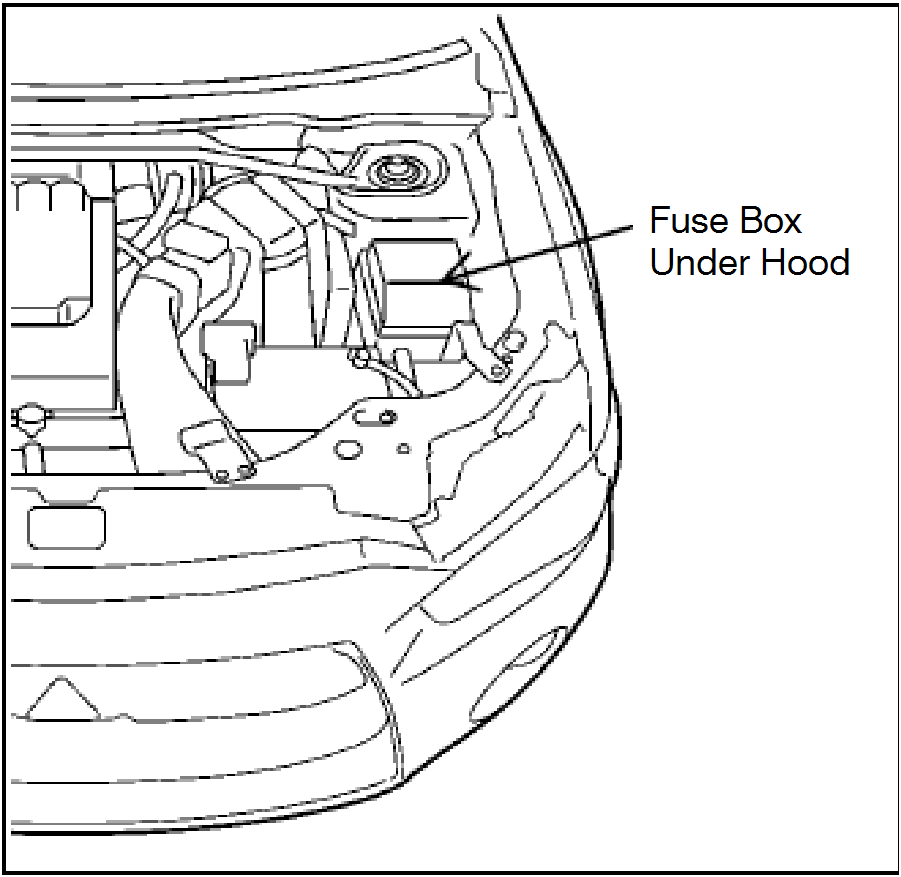
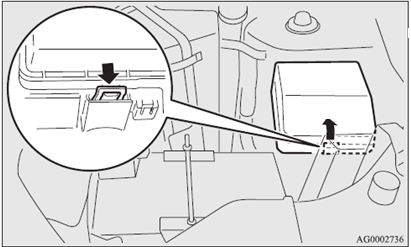
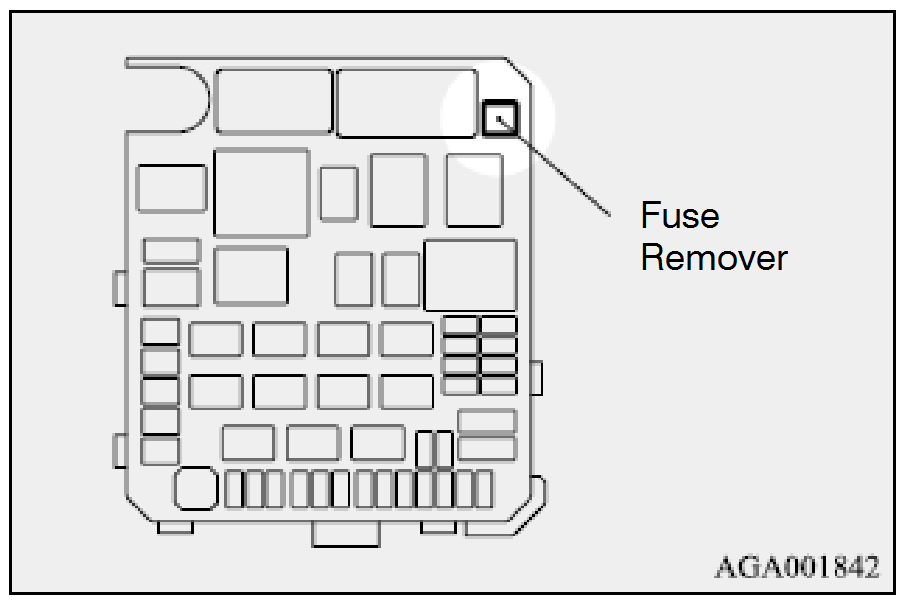
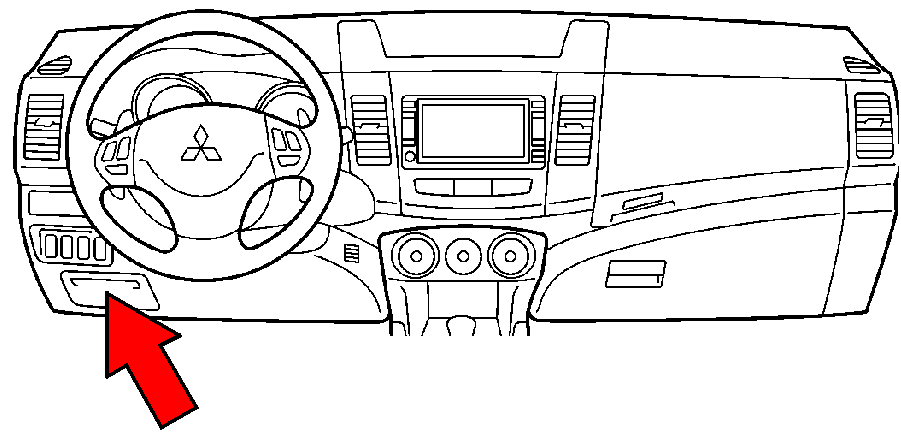
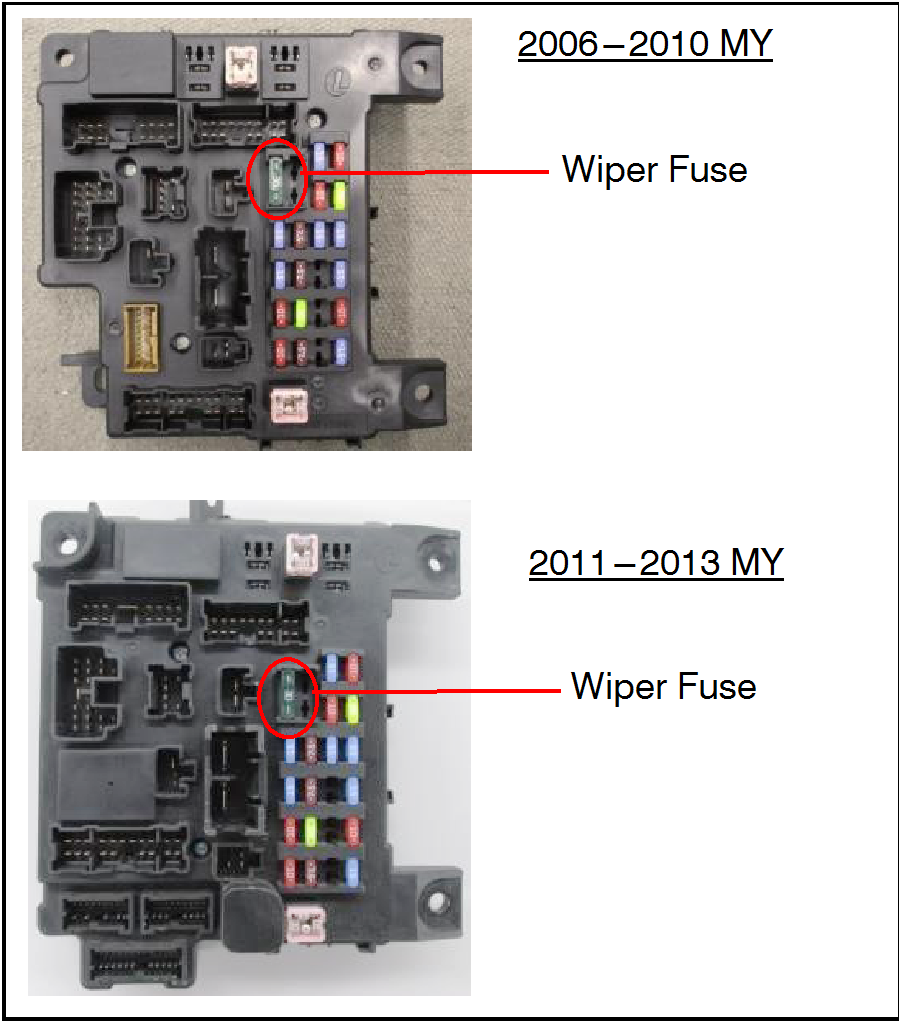
![]() A Fuse Remover MUST be used to remove fuses. Use of other tools such as pliers can potentially result in thermal incidents.
A Fuse Remover MUST be used to remove fuses. Use of other tools such as pliers can potentially result in thermal incidents.
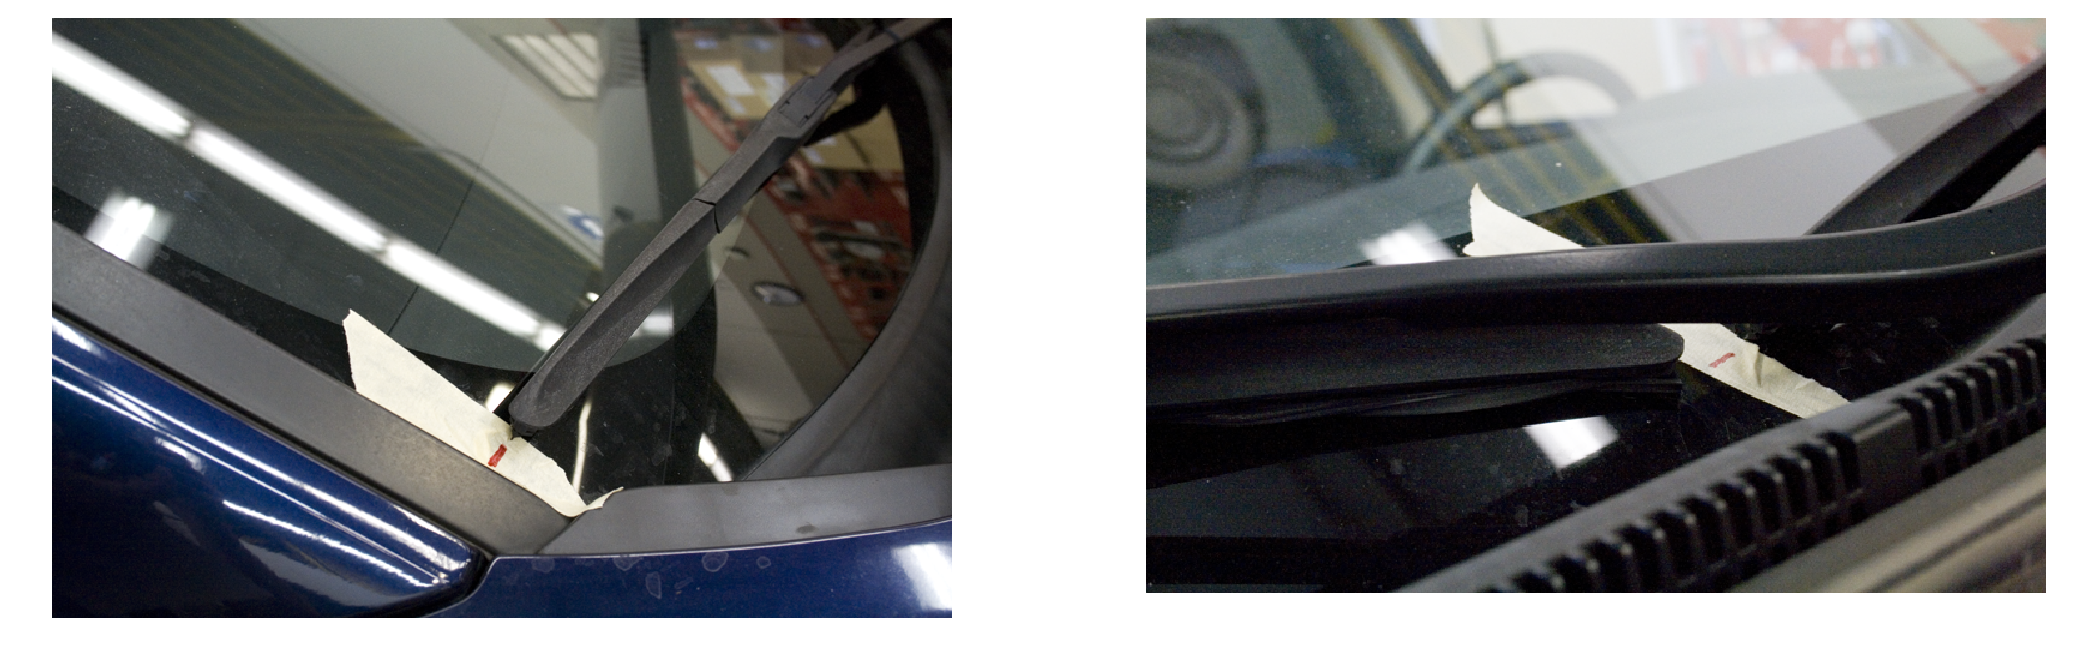
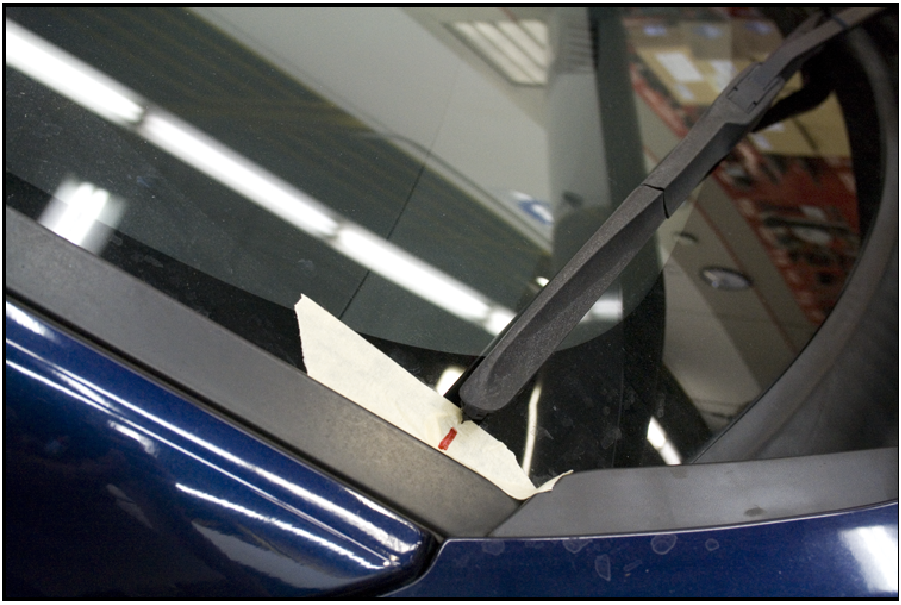
IMPORTANT: Before marking the windshield wiper positions, lift the wiper blade from the windshield and set it back down to ensure that they are resting in their intended positions.
IMPORTANT: Use a fender cover, towel, or similar accessory to protect the fender.
- Attach masking tape to the windshield and mark the wiper blades’ positions as shown.
- Remove the wiper arm blade assembly.
 |
|
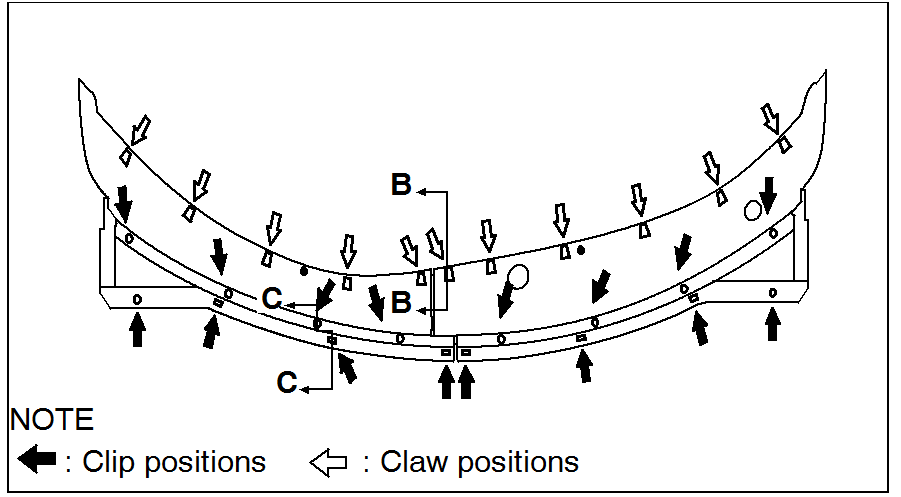
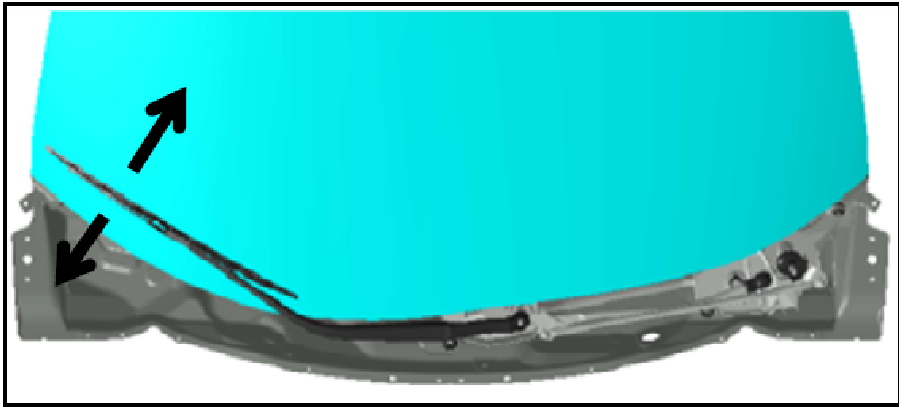
- Remove the passenger side hood rear weatherstrip from the deck garnish.
NOTE: Do not remove the driver side hood rear weatherstrip from the deck garnish (for easier reassembly).
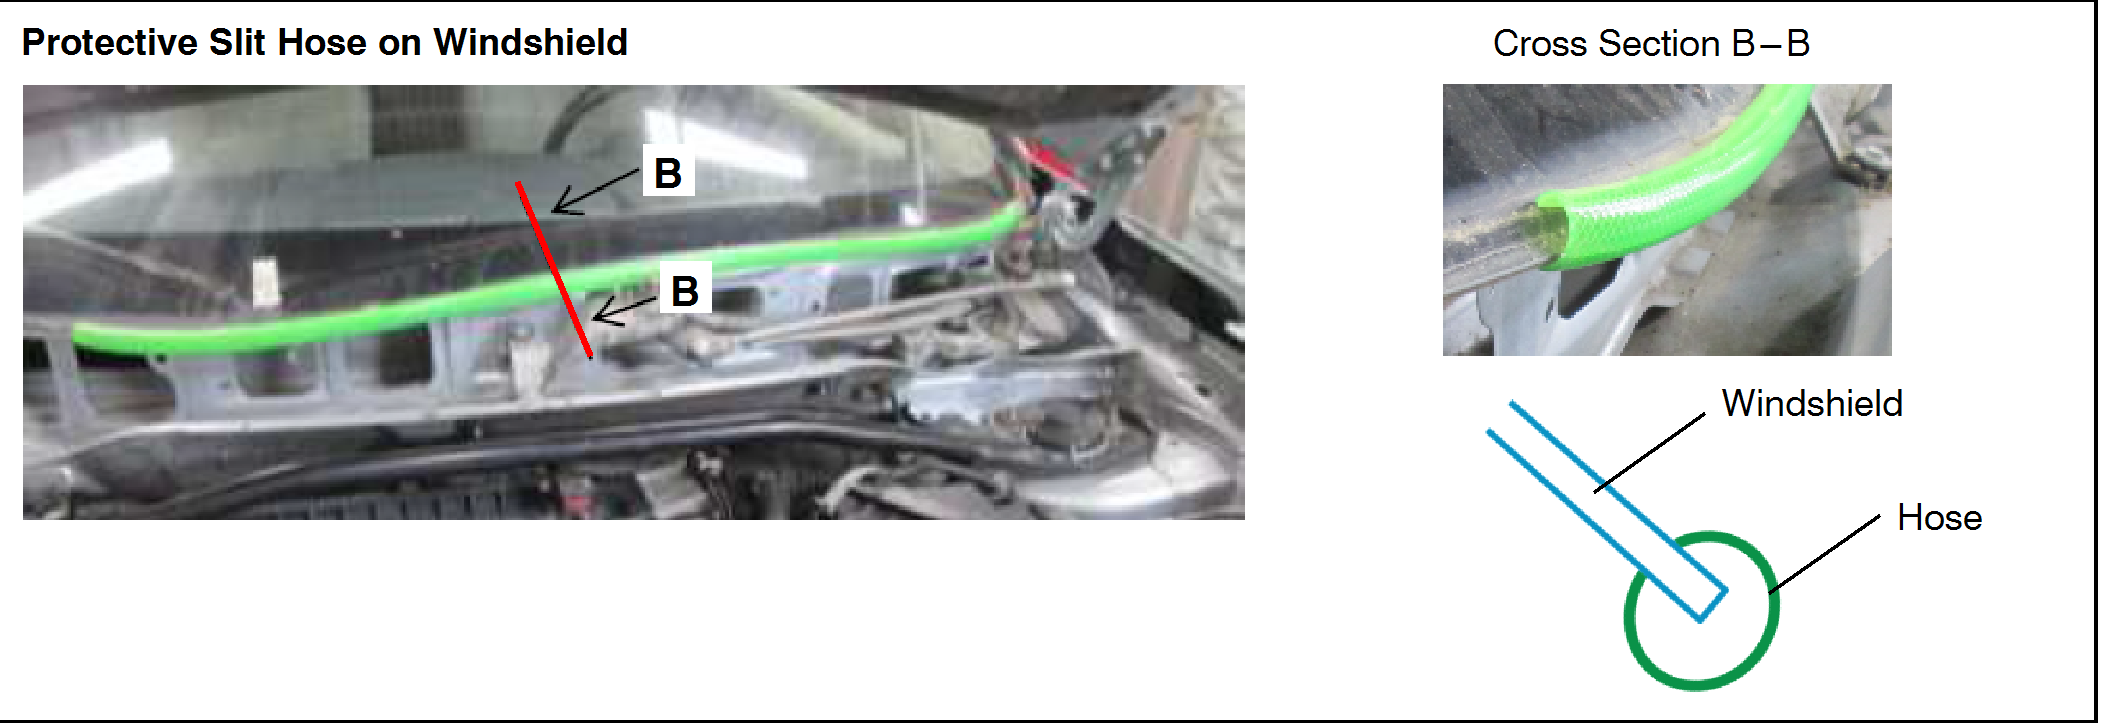
- Protect the windshield with a protective slit hose.
- Make a protective slit hose as shown below.
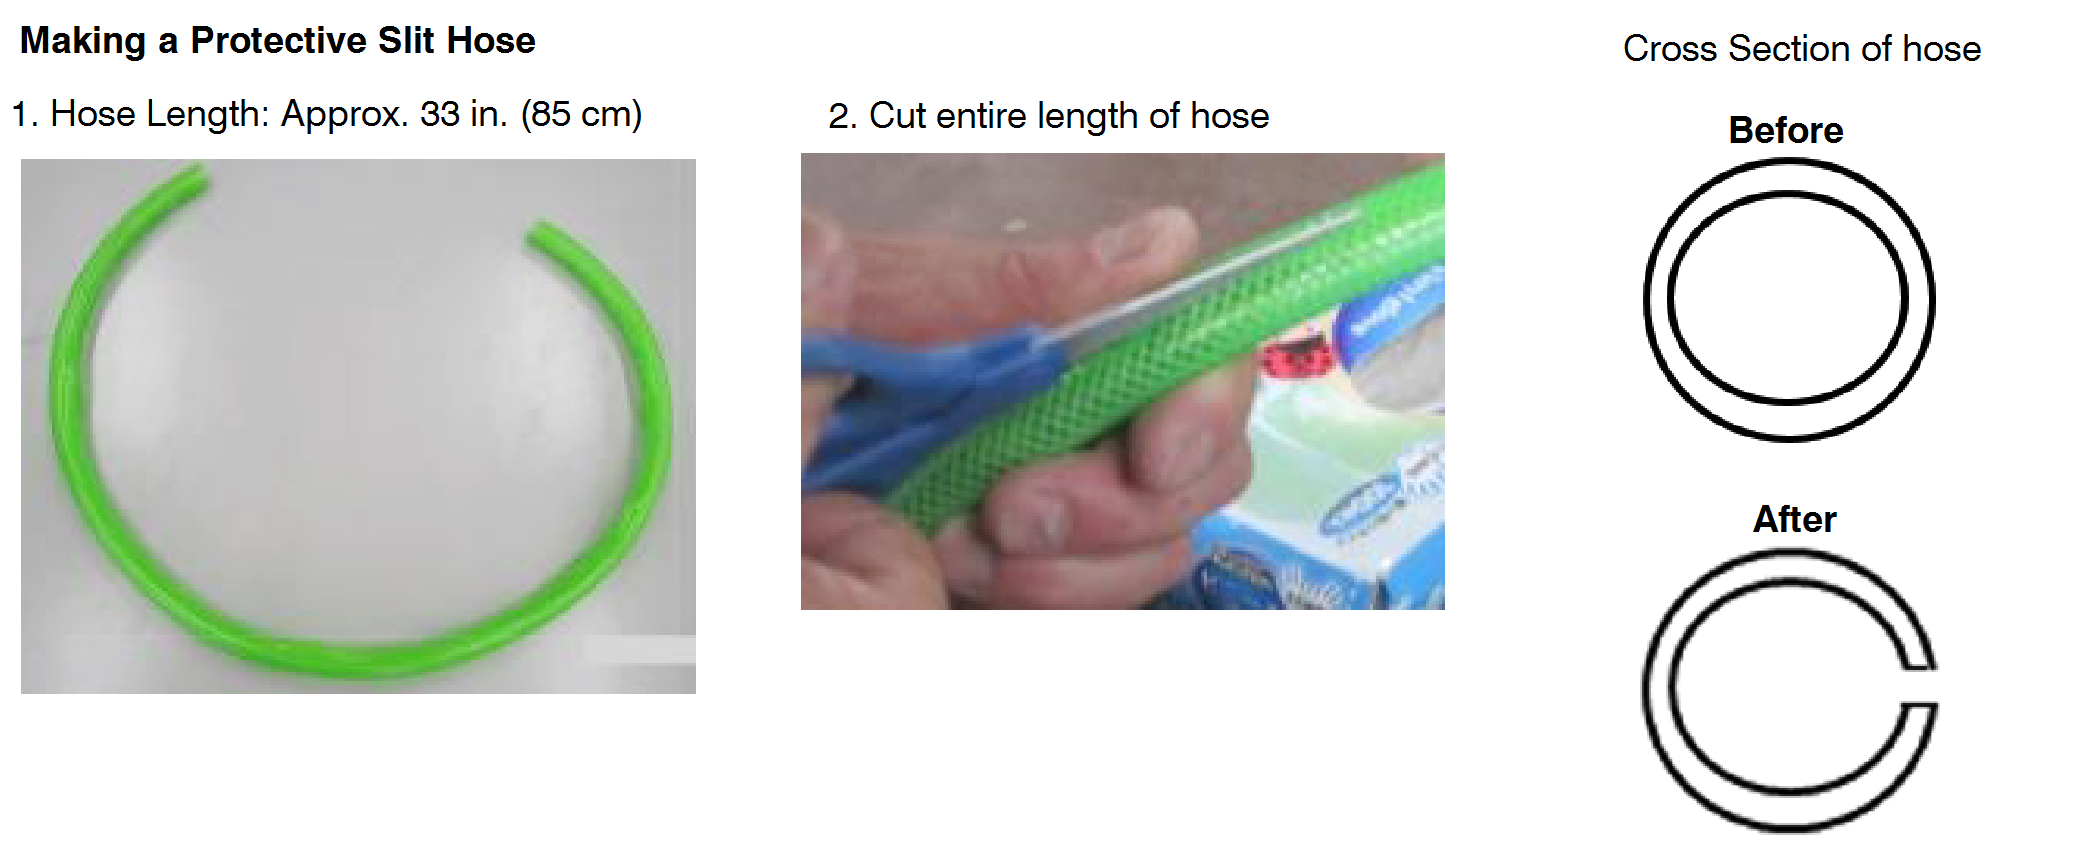
- Cover the edge of the windshield with the protective slit hose.
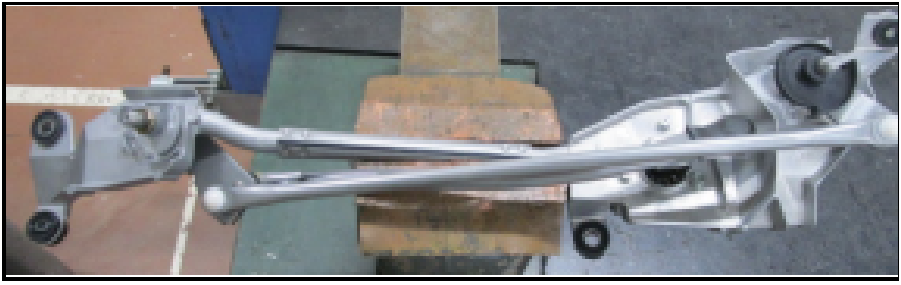
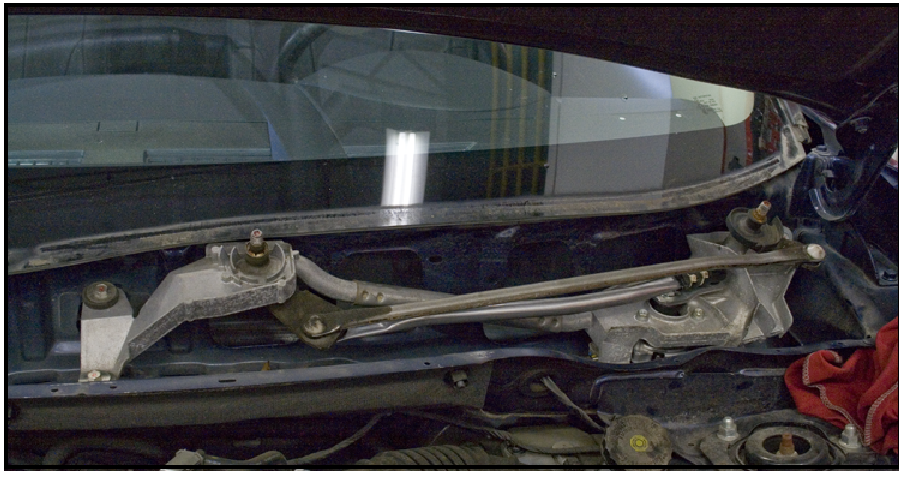
- Unbolt the wiper link assembly, disconnect the wiper motor connector, and remove the wiper link assembly from the vehicle.
![]() Clamp the wiper link assembly at the connection pipe only.
Clamp the wiper link assembly at the connection pipe only.
 |
|
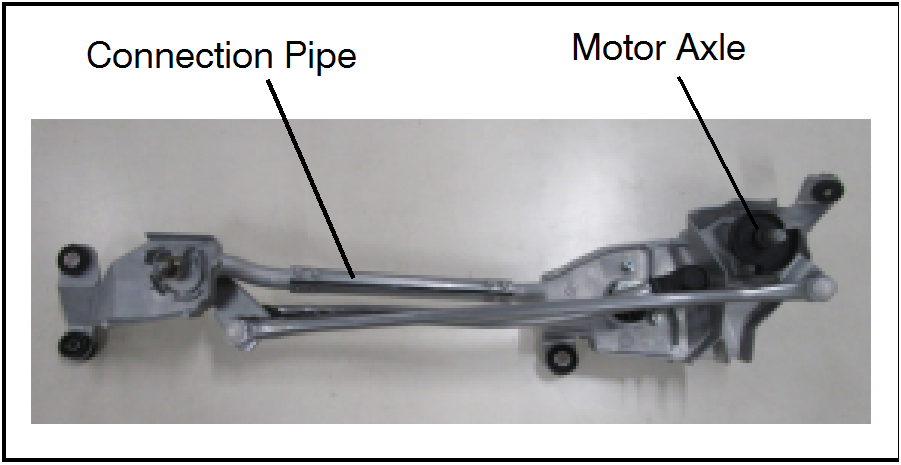 |
CAUTION: Clamp ONLY the connection pipe section. |
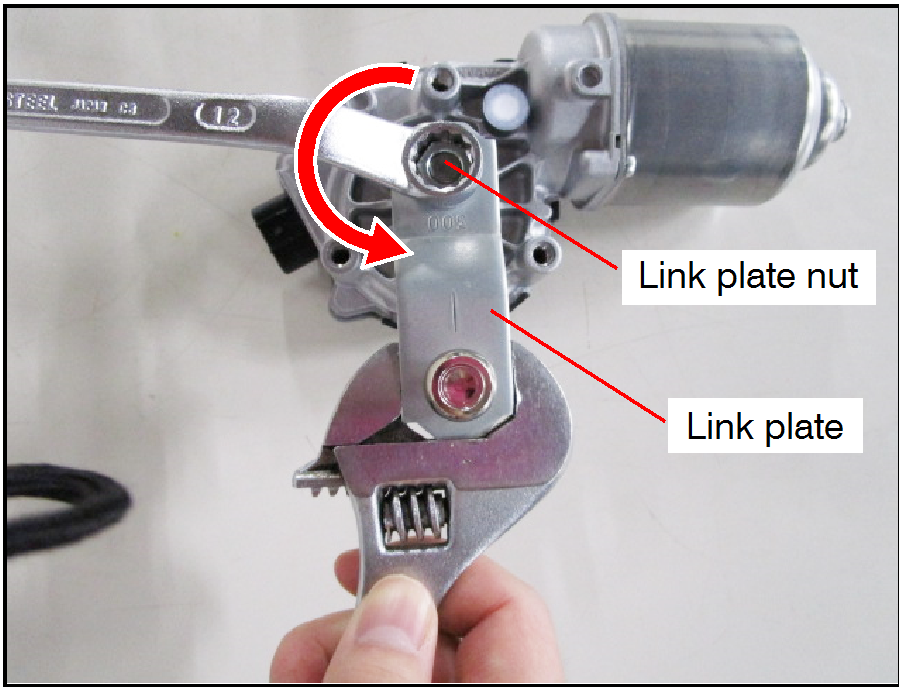
- Use a pry bar or similar device to separate the wiper link rod from the wiper link plate.
Insert the pry bar and lift using leverage in area shown below.
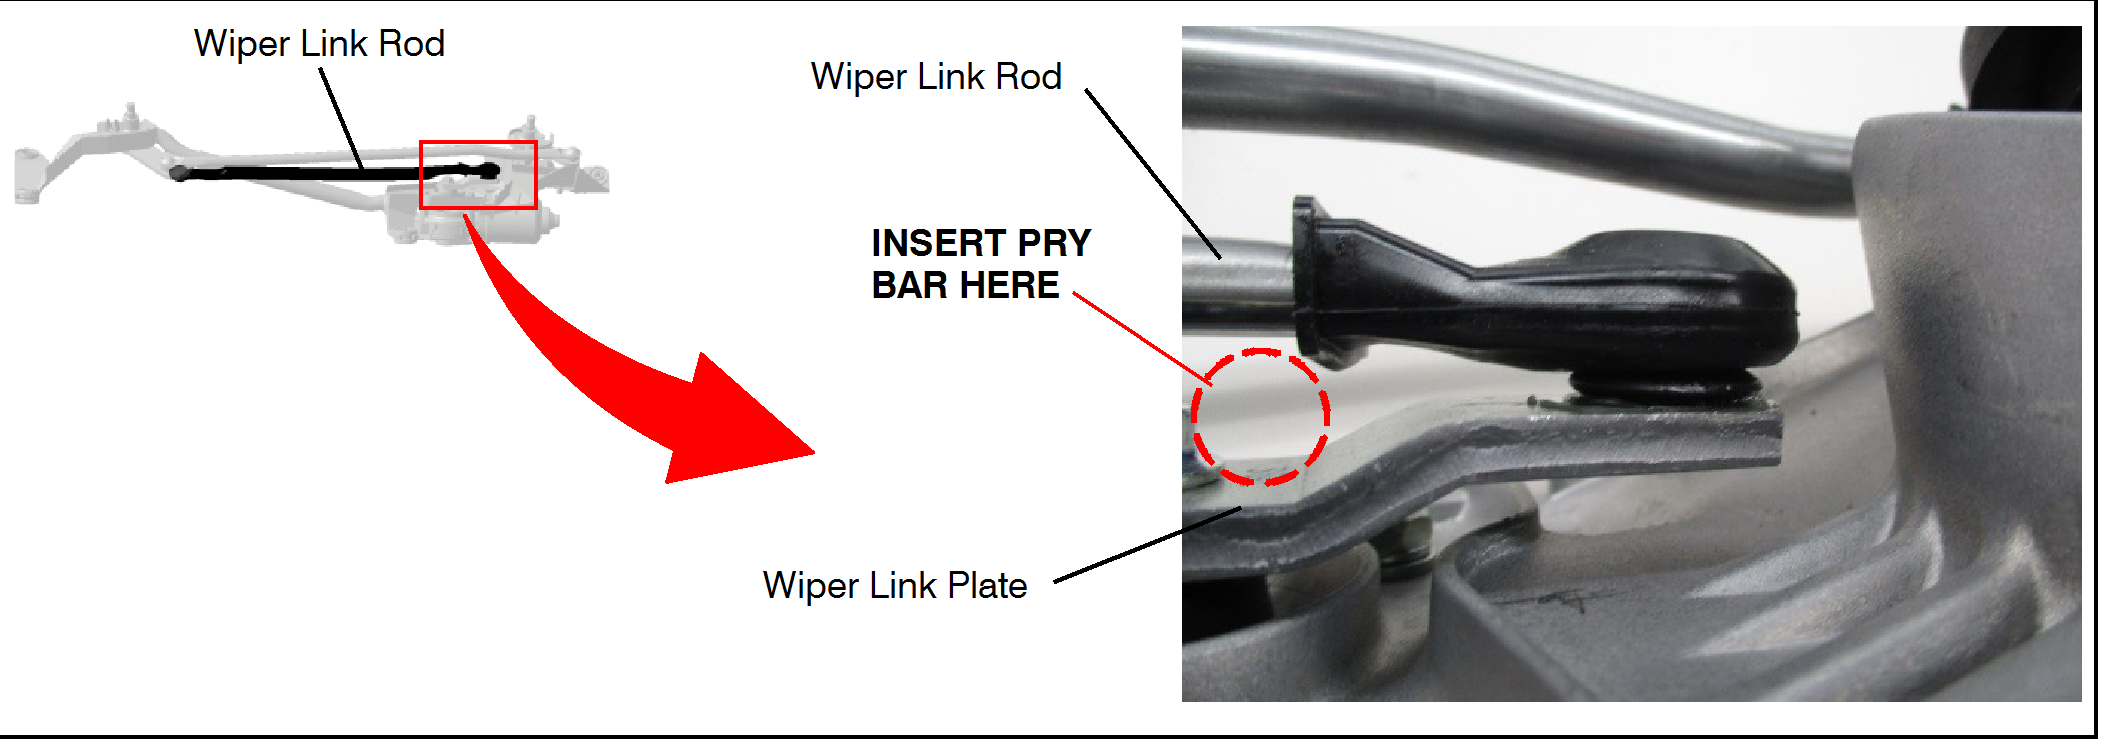
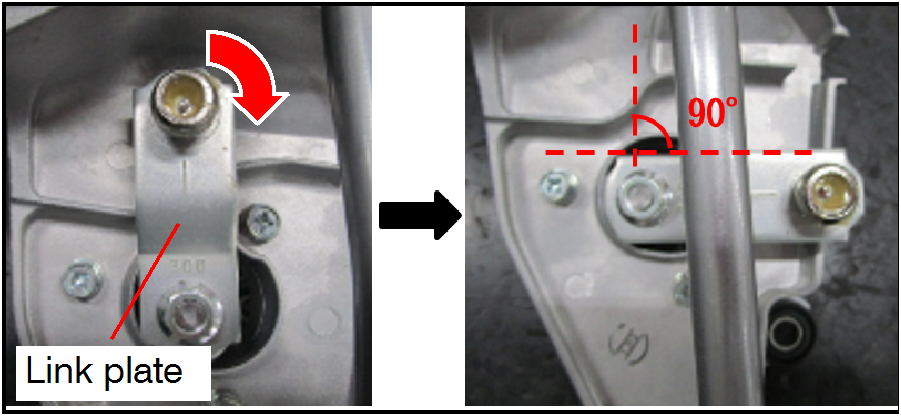
![]() Turn the link plate slowly to avoid internal damage to the wiper motor.
Turn the link plate slowly to avoid internal damage to the wiper motor.
 |
|
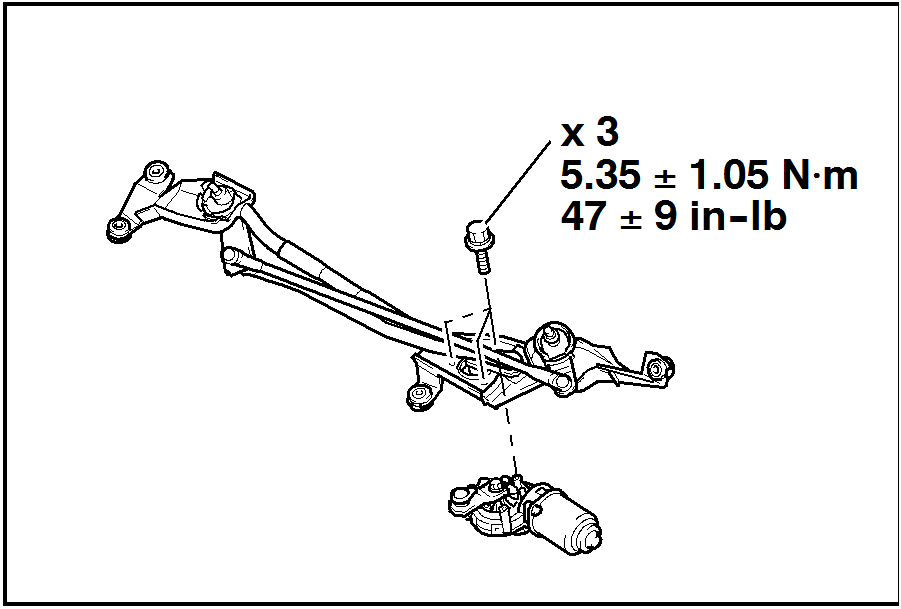
- Remove the wiper motor.
 |
|
 |
|
 |
|
 |
|
 |
|
PERFORM SR-16-009, “WINDSHIELD WIPER LINK – SAFETY RECALL CAMPAIGN”
|
|
 |
|
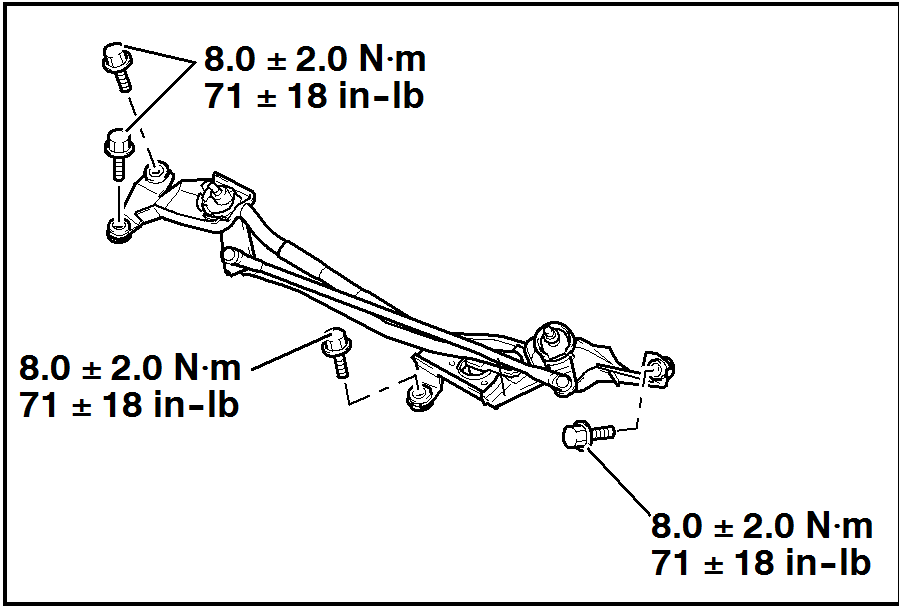 |
Torque bolts to 71 ± 18 in-lb (8.0 ± 2.0 Nm). |
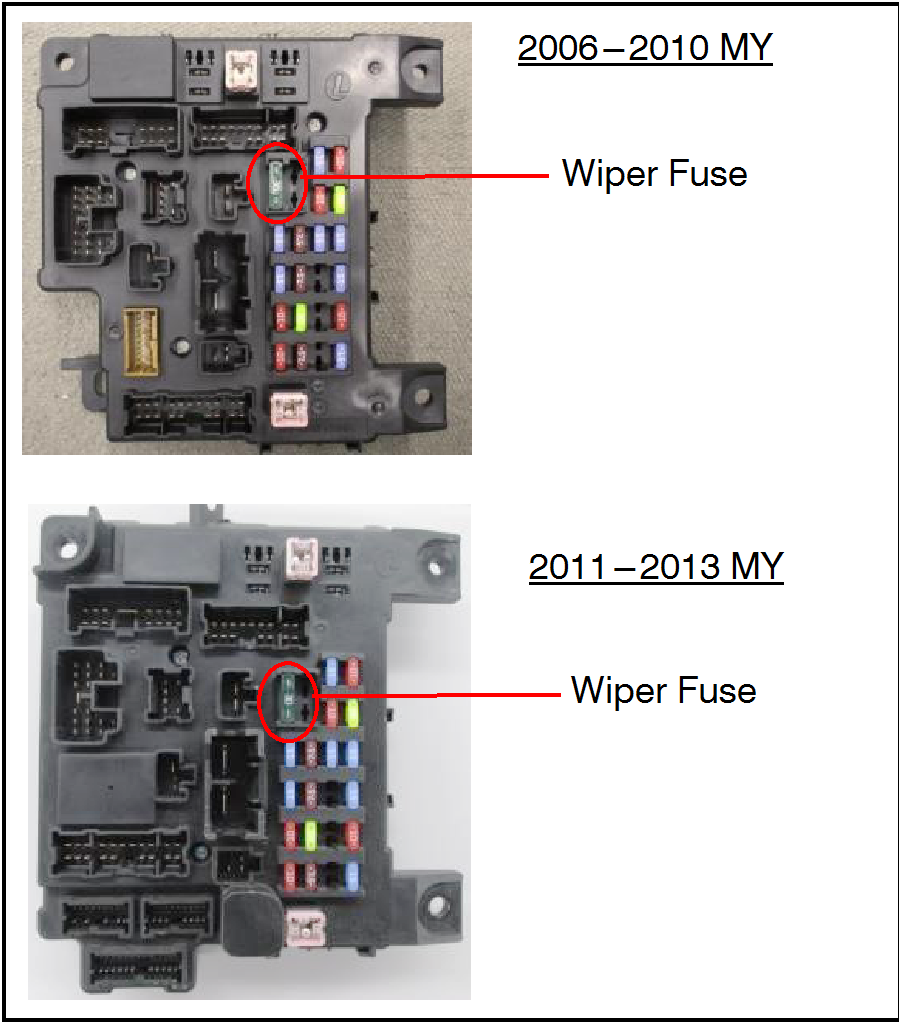
![]() Do not allow any appendages, clothing articles, or other items to make contact with the wiper link assembly. The wiper may move once the wiper fuse is reinstalled, causing bodily injuries and/or damage to vehicle.
Do not allow any appendages, clothing articles, or other items to make contact with the wiper link assembly. The wiper may move once the wiper fuse is reinstalled, causing bodily injuries and/or damage to vehicle.
 |
|
|
|
 |
|
 |
|
 |
|
PARTS INFORMATION
| Part Number | Part Description |
|---|---|
| 8250B137 | WIPER MOTOR |
WARRANTY INFORMATION
| # | Repair Procedure | Model Years | Campaign Operation |
Labor Time Allowance |
Part Number | |
|---|---|---|---|---|---|---|
| 1 | Replace Windshield Wiper Motor | 2007-2013 | C1613S01 | 0.6 hours | 8250B137 | |
WARRANTY / RECALL CAMPAIGN CLAIM INFORMATION
Enter all claims as claim type ‘C’ – Recall/Campaign Claims.
Please follow the campaign instructions when entering each claim in order to select the applicable operation code that correctly matches up with the work that was actually performed. A claim example is provided below.
Certain 2007-2013 MY Outlander models
Claim Header Section:
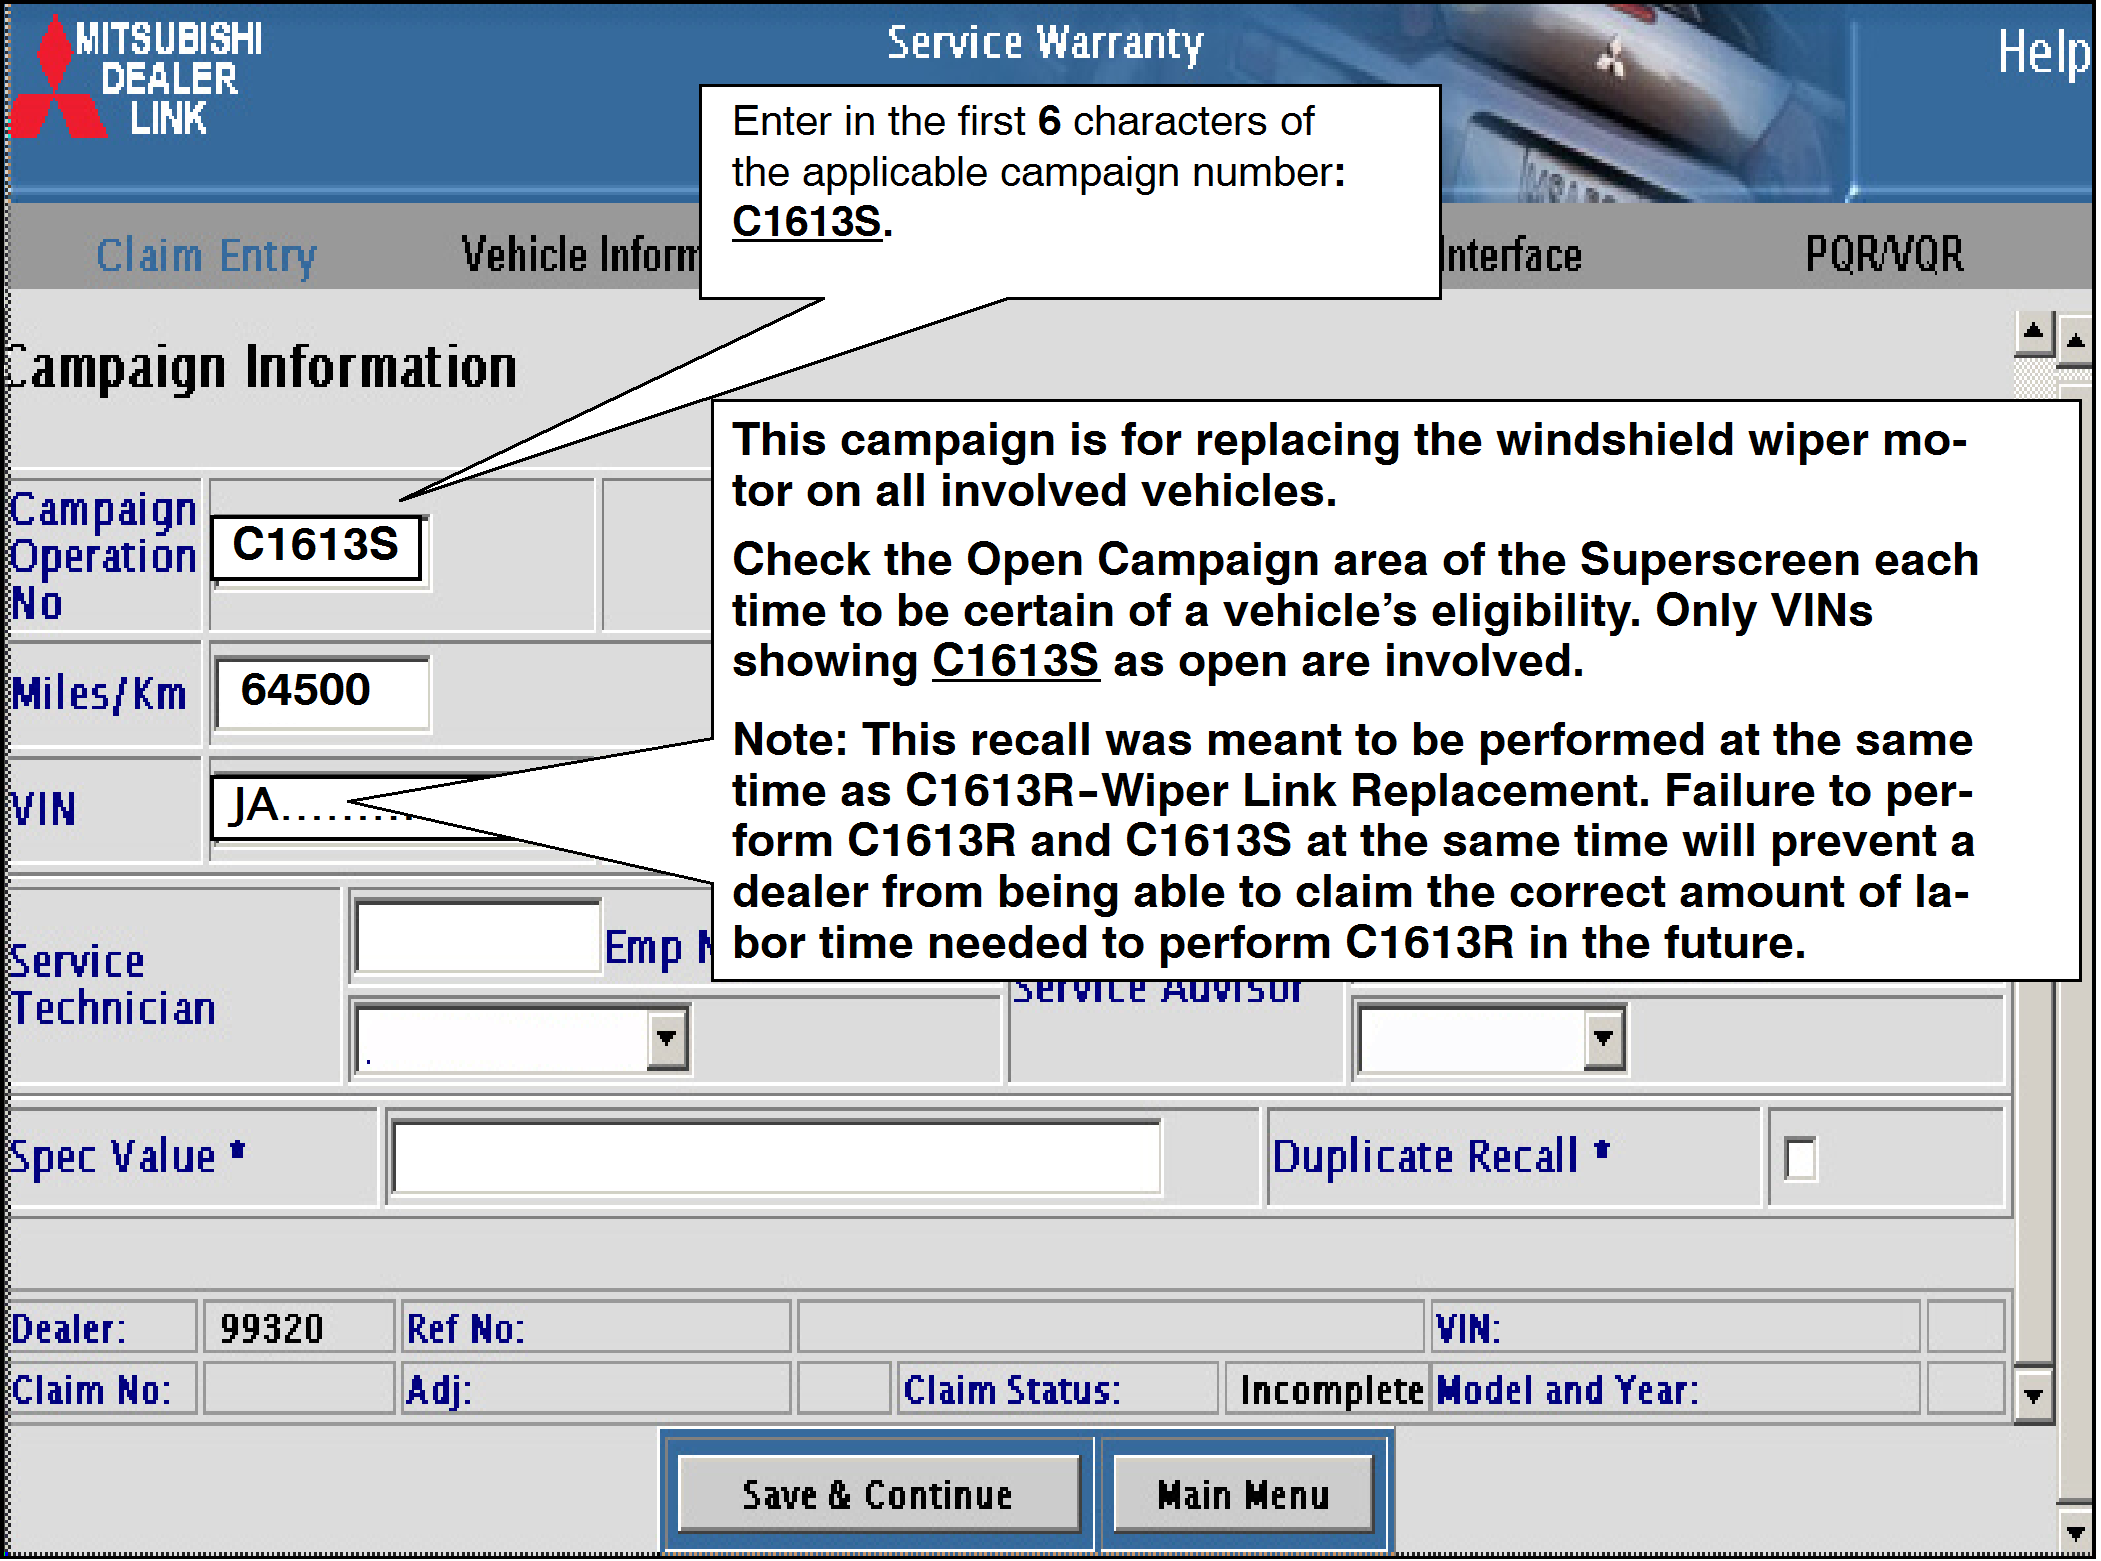
After entering the required customer data, vehicle information, select the applicable campaign number and the one replacement scenario performed. Then, by hitting the “Save and Continue” button, the system will automatically fill-in several fields. See the labor parts examples on the next page.
Labor and Parts
Labor: There is 1 repair scenario for this campaign – Replace the wiper motor.
Replace the windshield wiper motor: C1613S .6 hrs. labor
——————————————————
Parts: Replace the windshield wiper motor.
Replace with part number: 8250B137 Wiper Motor Assembly
No other parts are required.
Campaign Claim
Follow the allowed labor time and required parts to be replaced depending on the one specific campaign operation that applies to the specific vehicle. The applicable campaign operation is shown on the Superscreen.
| # | Repair Procedure | Model Years | Campaign Operation |
Labor Time Allowance |
Part Number | |
|---|---|---|---|---|---|---|
| 1 | Replace Windshield Wiper Motor | 2007-2013 | C1613S01 | 0.6 hours | 8250B137 | |
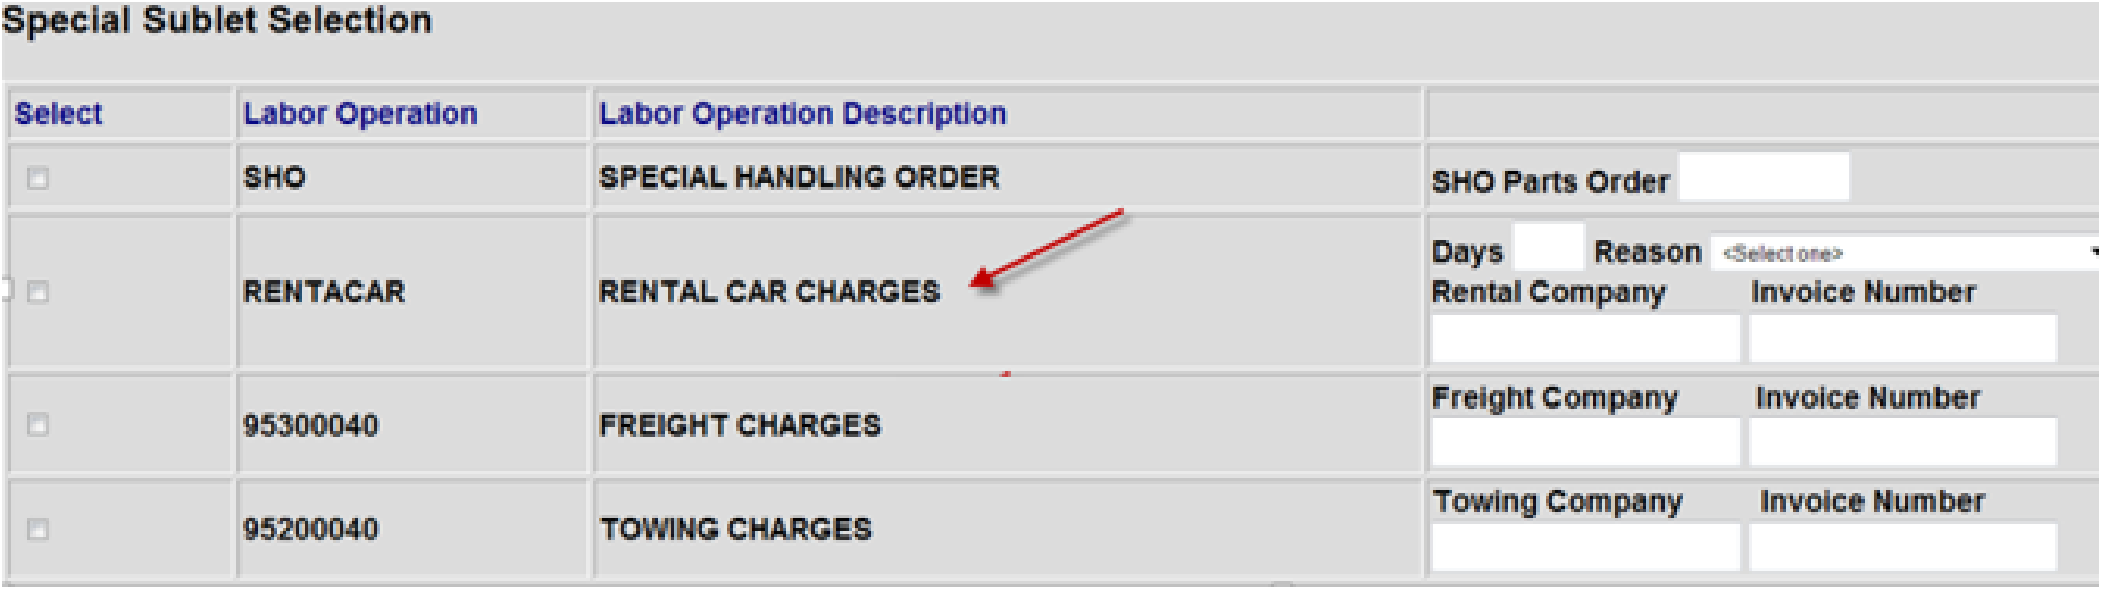
Rental Cars and/or Towing Charges:
If there is a need to provide the owner with a rental car, claim the applicable charges in this section of the claim on the lower portion of the labor entry screen.
https://static.nhtsa.gov/odi/rcl/2017/RCRIT-17V461-6155.pdf
 Loading...
https://static.nhtsa.gov/odi/rcl/2017/RCONL-17V461-2304.pdf
Loading...
https://static.nhtsa.gov/odi/rcl/2017/RCMN-17V461-7509.pdf
Loading...
https://static.nhtsa.gov/odi/rcl/2017/RCMN-17V461-8501.pdf
Loading...
https://static.nhtsa.gov/odi/rcl/2017/RCAK-17V461-6775.pdf
Loading...